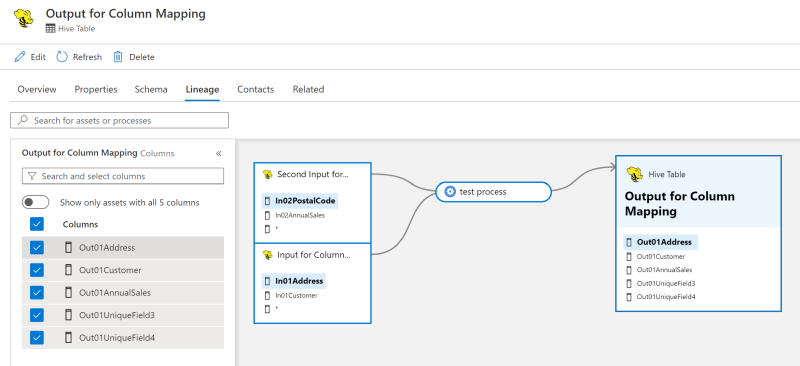
Custom Lineage and Column Mapping in Purview

If you're using Azure Purview you can create custom types for both your data sources as well at ETL tools. Using custom Process types, we can create a custom lineage between any data sources. In Azure Purview, we are able to take advantage of its UI feature called columnMapping which essentially shows the column level lineage!
Before you get started be sure that you've installed PyApacheAtlas and confirmed that you can authenticate against your Purview instance.
Creating a Custom Process Type
A Process type is created via an Entity Definition. We need only to reference the Process as the superType.
from pyapacheatlas.typedefs import EntityTypeDef

proc_type = EntityTypeDef(
    name = "my_custom_process",
    superTypes = ["Process"],
)
This is the bare minimum we need to represent a custom process. It allows for us to track inputs and outputs as well as provide a description, owners, and experts as well. We don't have to specify the description, owner, and expert attributes since they are already inherited from the core Process type.
However, this doesn't keep track of columnMapping by default. So we need to add an Attribute Definition too.
Adding the columnMapping Attribute
Our minimum process type that includes column mapping would look like this:
from pyapacheatlas.typedefs import (AtlasAttributeDef,
    EntityTypeDef)

proc_type = EntityTypeDef(
    name = "my_custom_process",
    superTypes = ["Process"],
    attributes = [
        AtlasAttributeDef("columnMapping")
    ]
)
We've added a "columnMapping" attribute with a default of string type and set to being optional.
Now we can upload this type to our Purview instance and start creating instances of this custom process type. If you haven't authenticated before, see the installed PyApacheAtlas page.
from pyapacheatlas.auth import ServicePrincipalAuthentication
from pyapacheatlas.core import PurviewClient

# See the install page for more detail on authentication methods.
# auth = ServicePrincipalAuthentication()
# client = PurviewClient()

client.upload_typedefs(entityDefs = [proc_type], force_update=True)
Now our custom process type is ready to use.
Create an Instance of Our Custom Process
Since this is custom lineage, we need to have some inputs and output entities to point to.
The script below creates three entities: two DataSets as inputs, one DataSet as output, and one of our custom process type entities to link the input with the output.
from pyapacheatlas.core import AtlasEntity, AtlasProcess
ae_in01 = AtlasEntity(
    name = "customer",
    typeName = "DataSet",
    qualified_name = "some/unique/entity01",
    guid = "-1"
)
ae_in02 = AtlasEntity(
    name = "address",
    typeName = "DataSet",
    qualified_name = "some/unique/entity02",
    guid = "-2"
)

ae_out = AtlasEntity(
    name = "customer_master",
    typeName = "DataSet",
    qualified_name = "some/unique/entity03",
    guid = "-3"
)

proc = AtlasProcess(
    name = "MyCustomProcessInstance",
    typeName = "my_custom_process",
    qualified_name = "something/unique",
    guid = "-4",
    inputs = [ae_in01, ae_in02],
    outputs = [ae_out]
)
Now we need to craft our column mappings. Let's assume we have column lineage / mapping that looks like this:
- customer.cust_id maps to customer_master.cust_id
- customer.zip_code maps to customer_master.full_address
- address.add1 maps to customer_master.full_address
- address.add2 maps to customer_master.full_address
We need to create a column mapping object that consists of an array with objects that follow the below structure:
- DatasetMapping: Object containing keys Source and Sink with values of the qualified names for the source and sink datasets whose columns are being mapped.
- ColumnMapping: Array containing objects with keys Source and Sink with values of the column names that are being mapped.
- Special Note: The columns referenced do not actually have to be part of the entity's schema.
- Instead, any string you provide in the ColumnMapping objects will appear in Purview, assuming the DatasetMapping qualified names are valid.
You'll see that the top level array will contain one object for every Source and Sink combination where columns are being mapped.
col_map = [
    {
        "DatasetMapping": {
        "Source": ae_in01.qualifiedName, "Sink": ae_out.qualifiedName}
        "ColumnMapping": [
        {"Source": "cust_id", "Sink": "cust_id"},
        {"Source": "zip_code", "Sink": "full_address"}]
    },
    {
        "DatasetMapping": {
        "Source": ae_in02.qualifiedName, "Sink": ae_out.qualifiedName}
        "ColumnMapping": [
        {"Source": "add1", "Sink": "full_address"},
        {"Source": "add2", "Sink": "full_address"}]
    }
]
Now we can update our process attributes to include a stringified json object with json.dumps
import json

proc.attributes.update("columnMapping": json.dumps(col_map))
Upload the Entities
Now that the process is updated and contains the columnMapping attribute value, let's upload.
results = client.upload_entities([proc, ae_in01,
    ae_in02, ae_out
])
print(json.dumps(results, indent=2))
Now, search in Purview for "MyCustomProcessInstance" to observe the lineage we created with the column mapping feature visible on the Lineage tab!